My lovely blogland friends

Friday 27 November 2015

White plus one at Polkadoodles

Good morning folks, my project today is for our 'While plus one' challenge at  Polkadoodles so its a nice easy theme for you. I hope you're going to play along to be in with a chance of winning a prize to spend in the Polkadoodles store!!


 I've gone for a sepia tone for my little altered notebook and coloured up the beautiful  digi stamp 'Cinders'  (you can find her here). I've coloured the image with my Lyra pencils and used her to cover a little notebook, adding ribbon, lace bead trim and a little flower. I've inked around the edges with distress inks and added a little gilding wax to finish off.

I'm entering this project in the following challenges:

Crafts Galore Encore: use a stamp or digi
Crafty Time: embellish it
Creative Moments: anything goes
Just keep on crafting: anything goes
Simon Says Stamp: anything goes
Sparkles Forum Challenge: anything but a card

Thanks so much for visiting today
Claire xx


Monday 23 November 2015

Dotty Centre Flower from Chocolate Baroque

Good morning my lovelies. I got all crossoppled with my posting dates over on the Chocolate Baroque DT blog but anyway here's a little  project that would make an ideal stocking filler made using the beautiful Dotty Centre Flowerhead stamp from Chocolate Baroque.


I stamped the Flower on heat resistant acetate using Versamark ink and embossed with Gold Embossing Powder. I cut the flower out and snipped in between the petals before bending each petal up a little. I stamped the center of the flower again on a scrap of my background card, embossed with Gold Embossing Powder and then cut otu the centre and layered it up over the acetate flower. This enables you to glue the flower onto your projects without seeing the glue.

It was at this point that I decided to make a post it holder as popped the flower to dry on top of some post it notes and realised it was a perfect size. I didn't bother to measure anything, just used the pad of post-its to score a strip of white linen card to fit.


I cut some scraps from my stash of inky backgrounds to cover the white linen card, edging each piece with a gold Krylon pen. I attached the pieces of background to the linen card, trapping a scrap of ribbon at each end of the inside to create a fastener.

I stuck the flower to the top of my little project and to finish off I added some dots of faux pearls to the flower.

I'm entering this project in the following challenges:
Artistic Inspirations: anything goes with a twist of feminine
Crafting for all seasons: embossing
Creative Fingers: Anything goes
In the pink: fancy folds
Karleigh Sue Challenge: one for the girls
Not just cards: anything goes
Simply Papercraft: anything goes
Wags'n'Whiskers: embossing

Thanks so much for visiting today
Claire xx

Sunday 22 November 2015

Anything Mixed Media/Creative Goes at We love 2 Create

Good morning, brrrrrrr Winter has arrived all of a sudden, we've had high winds and its been bitterly cold so I'm spending the weekend bunkered up crafting and eating chocolate so I'm not complaining too much about the weather lol. Anyway its challenge time over at We Love 2 Create and as always' we're being very gentle on you as our theme is 'Anything Creative/Mixed Media Goes'. We've got some lovely crafty goodies lined up for our lucky winner too, thanks to those lovely folks at Premium Craft Brands.

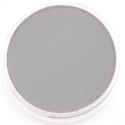
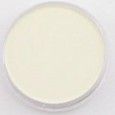
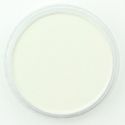
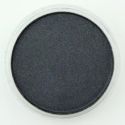
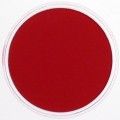
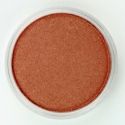
 I've been colouring with my PanPastels this week, they blend so easily especially if you add the amazing colourless blender into the mix that they are perfect for colouring stamped images.


The stamp I've used is from Prima, she's called Jing and I really enjoyed colouring her.


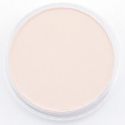
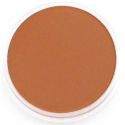
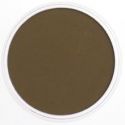
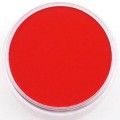
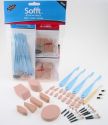
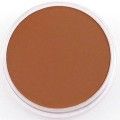
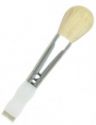
I find that Burnt Sienna Tint is a fab base skin colour and use Burnt Sienna and Raw Umber to add depth and shadows. Although these colours seem really dark I just use a little colour and then dip my Sofft tool in the colourless Blender and then they blend in easily. I coloured the image using Sofft tools, the teeny ones like eyeshadow applicators for the skin and one of the sponge bars for her hair. 
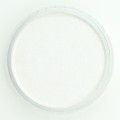
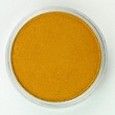
The bar applicators are fab as they can add a broad sweep of colour or if you use the edge you can add very fine lines. Don't forget you can use a pencil eraser with your PanPastels. I used an eraser to lift colour to create the highlights in her hair, removing the brown PanPastel and then applied Hansa Yellow Tint over the top
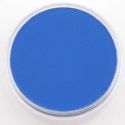
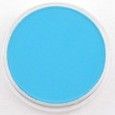
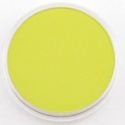
 The background was created with Turquoise and Bright yellow Green, blended and then overstamped with some background stamps from my stash. I masked Jing with copier paper and then stamped the text with Black Versafine ink and then stamped the stars with Versamark. I embossed the stars with blue and green WOW Embossing powders and added some stickles to the centre of the flowers to finish off.


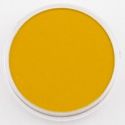
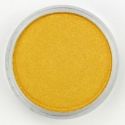
I framed her with a plastic frame from the poundshop that I painted with acrylic paints and then swiped with versamark and applied Light Gold PanPastel here and there before sealing with some matte medium.
I'm entering this project in the following challenges:
Brown Sugar: anything goes
Daring Cardmakers: anything but a card
Inspiration Destination: anything goes
Star Stampz: all about girls
Wags'n'Whiskers: Embossing

Thanks so much for popping by today, hope to see you again soon
Claire xx


Friday 20 November 2015

Glitter Christmas at Graph'It Colouring Challenge

Good morning folks, our challenge theme over at Graph'It Colouring Challenge is 'Glitter Christmas' and this time our sponsors are Polkadoodles and Cult Pens! Cult pens have some fab offers on Graph'It markers so its well worth a look.  I love to colour Nikky's gorgeous images so this challenge was a great excuse to colour this beautiful image from Octavia Frosted Winter Collection. Its called Polar Family and you can find it here as a digi or you can get the whole collection here (at a real bargain price too!)


For a full list of the colours I've used, pop over to the challenge blog.

To create clouds colour a rough cloud shape with your lightest grey (I used the green greys) and then add a bit of depth with a couple of darker greys. Add highlights by dotting a little ink from the White Graph'it Shake pen on my craft mat and dabbing it on with my finger


I'd printed the image out larger than I usually do so I just die cut a frame with Go Create dies and added a glittery bow, a little silver charm and popped a die cut snowflake and a sparkly flower on top of the bow.

I'm entering this card in the following challenges:

Creative Moments: Anything goes
Dream Valley: shaped card
Inky Chicks: Christmas
Love to Scrap: anything goes
Papertake Weekly: Let it snow
Simon Says Stamp: Christmas
The Ribbon Girls: any image
Unicorn Challenge: Christmas is coming

Thanks so much for visiting today
Claire xx

Wednesday 18 November 2015

Time Flies

Good morning folks, my project today is a clock made for my kitchen using lots of goodies from Indigo Blu. My kitchen clock was always fast and it was so confusing so I thought it was a good opportunity to use a clock kit and one of the gorgeous papers from the Floral Vignettes Mixed Media papers.


I covered the clock blank with the paper and then stamped the Indigo Blu Sunflower A6 stamp around the edges, adding some colour with Graph'It Markers. I added some paint splatters, rings and generally messed things up a bit. I drew an inner circle with a marker and a plate.  Then I added some stencilling using Fine Texture Paste to create the numbers and the foliage. Once that was dry I applied Flitter Glu and gilding flakes and dabbed on a bit of black gesso. To finish off I snipped the tiny butterflies from the cover image and popped them on the clock before sealing with a few coats of Slap it on.

I'm entering this project in the following challenges:
Allsorts: Anything but a card
Crafting from the Heart: Anything goes
Dragonfly Dreams: Fall colours
Indigo Blu Challenge: Time flies
Sweet Stamps: anything goes

Thanks so much for visiting today, hope to see you again soon
Claire xx

Sunday 15 November 2015

PanPastel Christmas

Good morning folks, its inspiration time at We Love 2 Create and I've created a quick and easy Christmas card for our 'Anything Mixed Media/Creative Goes' theme. You've got a whole week to play along and our lucky winner will receive some gorgeous crafty goodies from Premium Craft Brands! You don't have to use our products to enter just get your creative thinking caps on and have a play with what ever takes your fancy.


Pan Pastels are brilliant for creating scenic cards, they are much more forgiving than brayering. I began tearing a mask for the hills from copier paper and placing it about 1/3 of the way down the card. I used the negative space from a post it note I'd die cut my moon mask from to create the moon using Neutral Grey PanPastel, Silver PanPAstel and some PanPastel White Fine Pearl Medium. Then I masked the moon and added the sky using Ultramarine Blue PanPastel mixed with Black Fine Pearl Medium. I then created the hills using Neutral Grey PanPastel applied with a Sofft sponge tip applicator in little circular motions, moving the hill mask down to create the landscape. Next I added highlights to the hills with the Fine White Pearl Medium. it gives a lovely frosty sparkle but the photo doesn't pick it up. Next I stamped in the trees and little houses using stamps from Indigo Blu using Black Archival Ink, I used first and second generation stamping to add a bit of depth. Santa and his sleigh are also from Indigo Blu, again stamped with Black Archival ink. I used the edge of one of the trees to stamp a little 'grass' here and there.

I'm entering this card in the following challenges:

Alphabet Challenge: T is for Tis the season
Brown Sugar: No patterned paper
Crafts Galore Encore: use a stamp or a digi
Creative Corner: black, white plus one
Natalie and Amy's : Winter Scenes
Sisterhood of Crafters: Its beginning to look a lot like Christmas

Thanks so much for visiting today
Claire xx


Friday 13 November 2015

Christmas Sparkle at Graph'It Colouring Challenge


Hi folks, its challenge time over at Graph'It Colouring Challenge and this week we're sponsored by Make it Crafty! Our lucky winner will receive a $10 gift certificate and omg they have some gorgeous digi stamps!! We've also got a pack of Graph'It Markers up for grabs too, thanks to those lovely folk at Cult Pens, who have some amazing offers on too so its well worth a visit!


 I've coloured this fabulous quirky little scene, it's called Christmas Town and you can find it here
The DT were given a choice of colour palette's to work with, I chose this one 


I kind of lost the plot a bit with my colour swatch although I did use the colours I had to add some yellow as I was playing with a my White Shake pen to create a glow round the lights and the smoke effect - I just blobbed on a good bit of ink and used my finger to smudge it. I left it white for the smoke but went over in yellow around the lights.

I used texture paste to add some 'snow' and then used my Silver Sparkle pen with a waterbrush to add a frosty shimmer although it doesn't show up too well on the photo.

I'm entering this card in the following challenges:#
A Snowflakes Promise: Anything goes Christmas or Winter
CRAFT: Christmas
Creative Moments: anything goes
Digi Choosday: Christmas sparkles
Inky Chicks: Christmas
Sisterhood of Crafters: Its beginning to look a lot like Christmas
Whimsy Inspiration: Fall colours or Christmas

Thanks so much for popping by today, 
Claire xx

Wednesday 11 November 2015

Fruity free download from Chocolate Baroque

Good morning, I'm sharing a large tag made using a gorgeous freebie download which you can find over on the Chocolate Baroque Challenge blog. Lesley is soooooo clever and comes up with the most beautiful backing papers and this one with the subtle fruit design and the text is one of my all time favourites.


I covered the tag with the paper and distressed with a little gathered twigs distress ink. I stamped the  images (from Mellow Fruitfulness) and coloured with Graph'It Markers.


I added some kraft glassine, lace, hessian, ric rac trim, some pretty ribbon and a little watering can charm.

I'm entering this project in the following challenges:
Allsorts: ribbons and bows
Amusing : Leaves
Crafty Friends: add a charm
My Sheri Crafts: tag you're it
Pile it on: Leaves
That's Crafty: tag you're it
The Ribbon Girls: Anything goes

Thanks so much for visiting today, hope to see you again soon
Claire xx

Guest Designer at Crafting by Designs

Good morning, my first post of the day and I've got a snowy Christmas card to share. I've also got some exciting news as I've been asked to join the lovely talented team over at Crafting by Designs as their Guest Designer!! Our theme is 'Snowman' so this was a great excuse to ink up some old favourite stamps and create a wintery Christmas scene.


I love to create scenic cards and used Distress Inks and a Clarity Stencil brush for this one, I'm really pleased with the way the sky turned out. I began by stamping the images to create my scene. The snowmen are from Chocolate Baroque, I think they are retired now but they are some of my all time favourites. I've also used part of the 'Snowy Cottage' clear stamp from Chocolate Baroque. The Holly and little birds are stamps from Penny Black. I masked the moon and cut copier paper to create a mask for the foreground.  I used a stencil brush and distress inks in Spun Sugar, Scattered Straw, Evergreen Bough and Iced Spruce. I removed the moon mask and brushed on a little ink to give the moon a bit of dimension.


I added some colour to the snowmen, cottage and holly with Lyra Polycolour pencils  and added a little shadow to the snowmen too. The sentiment is also from Chocolate Baroque, stamped with versamark and embossed with Mercury Glass WOW Embossing Powder.
To finish off I've added some glitter to the snowy hills and a little silver bow and snowman charm.

I'm entering this card in the following challenges:
A Snowflakes Promise: anything Christmas/winter
Fantasy Stampers: Winter Wonderland
Natalie and Amy's: Winter Scenes
Penny Black and More: anything Christmas
WOW Embossing Powders: Anything goes

Thanks so much for visiting today
Claire xx

Tuesday 10 November 2015

Swirl Centre flower from Chocolate Baroque

Good morning folks, its been very wet and blowing a gale in my little corner of the UK so its been perfect weather to stay home and craft. Have you seen this month's beautiful new stamps from Chocolate Baroque? I've used the lovely 'Swirl Centre Flowerhead' to make this steampunk themed card.


It was a very quick card, I embossed some black cardstock with a steampunk embossing folder and coloured with PanPastels. I began with shades of green and turquoise and then applied versamark before liberally applying copper, bronze and rich gold. I love this effect, it gives a gorgeous rusty metal effect. I sealed it with a mix of Maimeri Matte Gel medium mixed with water in a spritzer bottle.

I stamped the flower head onto black card with versamark ink and embossed with WOW Copper embossing powder. I cut the flower out, curled the petals and layered it up over a scrap of copper coloured ribbon.

I'm entering this card in the following challenges:
CASual Chic: Precious Metals
Crafty Ribbons: Monochromatic
The Ribbon Girls: Anything goes
Scrap & Craft: shabby chic/vintage
Simply Papercraft: anything goes

Thanks for visiting today
Claire xx

Sunday 8 November 2015

Challenge time at We Love 2 Create

Good morning folks, its time for a new challenge over at We Love 2 Create and as ever its a nice easy one for you to join in as 'Anything Mixed Media/Creative Goes'. You don't have to use our products to play along and our lucky winner will receive some fabby crafty goodies from Premium Craft Brands!


I've been playing with texture paste and made another balloon bowl but this time I've stamped on tissue paper to line the inside. They are so easy to make and pretty sturdy too, I actually dropped this one and it didn't break :-)

To make the bowl I blew up a balloon and applied a little olive oil (not sure if this is necessary but I was worried the bowl would stick) and then used a spatula to apply a really thick layer of texture paste. I left it for a few day to dry and then popped the ballon leaving a lovely little bowl.

The inside of the bowl was decorated by painting with black gesso and then applying Metallic PanPastels. I stamped a large butterfly stamp from Indigo Bly with assorted Memento Inks onto tissue paper and stuck this inside the bowl with Maimeri Matte Gel Medium.


I decorated the outside with glitter initially but it was a bit 'in your face' so I dusted over with Metallic PanPastels and sealed with Maimeri Gloss Gel medium.


I used the same butterfly stamp to make my tag, stamping with versamark and applying PanPastels over the top. I also stamped a butterfly on kraft Glassine and used a white Graph'it Shake pen to add some highlights and stencilled in some little red flowers.

I also stamped the sentiment on glassine. I added some little gold pearls, ribbon and a blingy brad to finish off. I'm entering this project in the following challenges:

Brown Sugar: Tag you're it
Left of Centre: things with wings
My Sheri Crafts: Tag you're it
Not just cards: anything goes
Papertake Weekly: anything goes
That's Crafty: Tag you're it

Thanks so much for visiting today
Claire xx


Related Posts Plugin for WordPress, Blogger...